Your attack mode decides which players your blows can land on. Monsters are always fair game, whatever the mode. The icon sits just above the bottom panel, on the left of the belt, and the mode is also written in words under the figures in the middle of the panel.
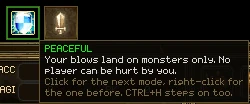
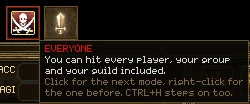
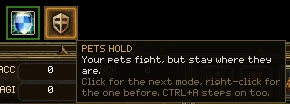
| Part | What it does |
|---|---|
| Attack icon | Shows your mode. Its edge is green for Peaceful, gold for the two modes that spare your own group or guild, and red for the two that can hurt anyone. Click it for the next mode, right-click it for the one before, or press Ctrl+H. |
| Pet icon | Only there while you have summoned or tamed creatures with you. Click and right-click step through the pet modes, and so does Ctrl+A. |
| Tooltip | Hold the pointer over either icon to read the mode's name, what it does and the key that changes it. |
The five attack modes
The key goes round them in this order and back to the start.
| Mode | Your blows can land on |
|---|---|
| Peaceful | Monsters only. This is where every character starts. |
| Not my group | Every player who isn't in your group. |
| Not my guild | Every player who isn't in your group or your guild. |
| War only | Players with a yellow or red name, and, during a land war, the guilds you're fighting. Nobody else. |
| Everyone | Every player, your own group and guild included. |
Out in the world, a player in Peaceful mode can't be attacked by other players at all, until they have a yellow or red name. Switch to any other mode and you can be attacked by anyone whose own mode reaches you. War only is the mode for fighting back: it never touches an innocent player, and it doesn't colour your name.
The five pet modes
| Mode | What your pets do |
|---|---|
| Pets free | Follow you and fight whatever you fight. |
| Pets heel | Follow you and don't fight. |
| Pets hold | Fight, but stay where they are. |
| Pets PvP | Follow you and go after players only, leaving monsters alone. |
| Pets off | Stand where they are and don't fight. |
Things nobody can attack
- NPCs, companions and items lying on the ground.
- Game masters.
- Another player inside a town, or from inside a town (see towns).
- Your own pets, unless you are in Everyone mode.
Killing another player outside a war costs you PK points. They're a debt, not a score: they drain away only while you're logged in, and while you carry them everyone can see it in the colour of your name.
- Each kill of an unmarked player costs 100 PK points.
- They drain at 1 a minute, and only while you're in the world. Logging out stops the clock, so you can't wait them out offline.
- Killing a player who already has a yellow or red name costs nothing. You're told so in chat.
- Kills in a land war never cost PK points.
- Your count is on the bottom panel, beside PK.
- A Potion of Repentance takes 30 points off, and a Potion of Repentance (II) takes 50.
What a name's colour means
| Colour | Meaning |
|---|---|
| White | Peaceful. Can't hurt a stranger, and can't be hurt by one. |
| Light brown | In a mode that can hit strangers: Not my group, Not my guild or Everyone. It goes back to white the moment they switch to Peaceful or War only. |
| Yellow | A killer, with 100 PK points or more. Peaceful mode no longer protects them, and killing them costs nothing. |
| Red | A murderer, with 200 or more. Everything yellow means, and town guards attack them on sight. Book sellers and some other NPCs won't serve them, and they can't make a town their revive point. |
The worst colour always wins, so a red name stays red in Peaceful mode.
Monster names
Monsters have colours of their own, which never mean PK. Lime is an open portal pulling people through, purple is a festival creature worth ten times the usual, orange-brown is a monster held still by Electric Shock or a trap, and bright red is one enraged by a failed tame, which fights other monsters for a while.
Towns are safe zones. Every town is ringed by glowing posts on the cells just outside it, so you can see where protection stops.
- No player can hurt another inside a town, and the rule works both ways: you can't hit someone inside from just outside, and you can't hit out from inside either.
- Monsters are another matter. A monster that wanders into a town can still be fought, and it can still fight you.
- Walking into a town makes it your revive point. When you die, you get up in the last town you entered (see dying).
- The clocks on your elixirs and other item buffs stop while you're in a town, so shopping and repairing never cost you buff time. Skill buffs keep running.
- The IP bar doesn't fill in a town (see the IP bar).
Settings → Graphics → Show safe zone borders turns them off on your screen. The town is just as safe either way.
Every blow goes through the same few rolls. Knowing them tells you which stats are worth chasing.
- Does it hit? The game rolls a number from 0 up to one less than the target's agility. If it's no higher than your accuracy, you hit. So once your accuracy reaches the target's agility you never miss, and a very agile target makes most swings go wide. A miss shows as "Miss" over their head.
- Is it turned aside? A shield's block chance can turn a plain blow aside, and evasion can turn an elemental one aside. Each point is worth twice as much against a monster's blow as against a player's.
- How hard? A weapon blow rolls your DC range, and the target's AC comes off it. A spell rolls its own power plus your casting stat (MC or SC) and ignores armour: the target's MR comes off instead.
- Elements. For a spell, your attack in its element adds twice its value. The target's resistance to that element then takes a tenth off per point, so 10 is immunity, and a negative resistance is a weakness that adds damage.
- A critical? Everyone starts with a 1% chance, and items and skills add to it. Against a monster a critical does double damage plus your Critical Damage. Between players it's only 30% more, so a duel isn't decided by one lucky swing. A monster's critical against a player still doubles.
How fast you swing
A swing is followed by a 1.4 second wait before the next. Each point of attack speed takes 47 ms off that, down to a floor of 0.8 seconds. Being slowed, neutralised or carrying too much (see weight) makes the wait longer. There's also a gap of at least 2 seconds between one spell and the next, and many spells have a longer cooldown of their own.
Target a monster, or just hold the pointer over one, and its box appears in the top left of the screen under the magic bar. It is the quickest way to tell whether a fight is worth starting.
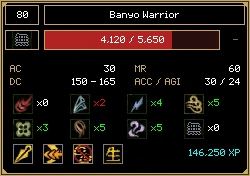
| Part | What it does |
|---|---|
| Level | The box in the top left. |
| Name | Grey while you're only pointing at it, white once it's your target. |
| Element cell | The element it attacks with, or physical. Hover for how strong. |
| Health bar | Its health now, out of its most. |
| + / - | Opens and closes the details below. Only on your target, and the game remembers which you chose. |
| AC, MR, DC | The armour your weapon has to get through, the resistance your spells have to get through, and how hard it hits. |
| ACC / AGI | Its accuracy and agility. Compare your accuracy with its agility to see how often you'll miss, and your agility with its accuracy to see how often it will. |
| Elements | Its resistance to each of the eight elements: white for none, green for a resistance and red for a weakness. A red one tells you which spell to throw. Hover an icon for its name. |
| Marks | How fast it attacks, how fast it moves, whether it can be tamed, and whether it is undead. Hover each for words. |
| XP | What killing it is worth. |
The numbers are the monster's own, right now. One standing in a curse shows the resistance it actually has.
Almost every distance that matters is invisible: how far a spell reaches, how close a monster notices you, how far you can talk to an NPC. Type /range and a number in chat to see one on the ground.
- /range 9 draws a tinted square on the ground covering every cell within 9 of you, with a grid of cells and "9 CELLS" written on its edge. It moves with you.
- /range clear takes it away. So do /range off and /range none.
- The most it draws is 60 cells. /range 0 marks the cell you're standing on.
The game counts a step on the diagonal the same as a step along a row, so everything within 9 cells of you is a square, not a circle. The corners really are in reach.
Press A to set up potions your character drinks without being asked. The game server does the drinking, so it keeps working when your connection is at its worst.
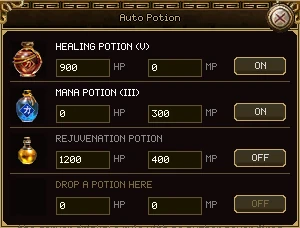
| Part | What it does |
|---|---|
| Potion cell | Which potion the row drinks. Pick a potion up in the bag and click the cell to set it. Click it with nothing in hand to clear the row. |
| Name | The potion's name, dimmed while the row is off. An empty row says DROP A POTION HERE. |
| HP box | Drink when your health falls below this number. Click it, type, and press Enter to save. 0 means "don't watch health". |
| MP box | The same for mana. |
| ON / OFF | Switches the row on and off without losing its numbers. |
The rules
- The numbers are amounts, not percentages. "Below 900 health" stays 900 when you level up.
- A row with both numbers set waits until both are low. That's how you set up one potion that restores both.
- A row with neither number set never drinks.
- Rows are tried top to bottom, so put the one you want first at the top.
- It never wastes a potion: a health potion isn't drunk at full health.
- It uses the normal wait between items, and it doesn't drink while you're cloaked or otherwise hidden, because using an item would give you away.
- The potion has to be in your bag.
If your bag weighs more than you can carry, everything you do slows down.
- The wait between swings doubles, and so does the wait between spells.
- Every step takes half as long again.
- Your own character is drawn in grey on your screen, and the weight bar in the bag turns red. Nobody else can see it.
- Only what's in the bag counts. What you wear doesn't.
If casting suddenly feels sluggish after a long trip, look at your bag's weight first. Sell or store something and the speed comes back straight away.
Dying is a setback, not a disaster. You lose no experience, and normally you drop nothing at all.
- You stay where you fell. If you were riding, you're knocked off your horse.
- The death window opens (see the death window). Get up whenever you're ready.
- You come back in the last town you walked into, with half your health. A map can also name its own revive point.
- If you don't choose, you're stood up automatically after 10 minutes.
When you do drop things
- Potion of Greed. For an hour it raises your drop rate by 50% and your gold by 100%. The price: if you die while it's running, each stack in your bag has a 1 in 10 chance of falling to the ground, or part of the stack. Worn items, locked items, wedding rings and items that can't be dropped are always safe.
- Stones that break. Some stones worn in the flower slot break when a monster kills you. See Items and the bag.
Not dying at all
Some items catch you before you fall. Wear one and, instead of dying, you're back to full health and mana. Then it has to rest before it can do it again.
| Item | Slot | Ready again after |
|---|---|---|
| Loop of Resurrection | Ring | 5 minutes |
| Guardian Angel's Flower | Flower | 30 minutes |
| Thorned Rose | Flower | 1 hour |
A Taoist's Celestial Light does the same once, and it's used up before an item is.
A player with 200 or more PK points can't make a town their revive point. They keep whichever one they had before they turned red.
It opens by itself when you die and closes by itself when you're back on your feet, whoever stood you up. It has no close button: there's only one thing a dead character can do.
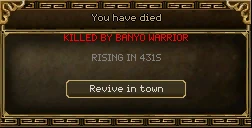
| Part | What it does |
|---|---|
| Killed by | Who or what killed you, in red. Just "You have died" when nothing with a name did it. |
| Rising in | How many seconds until you're stood up automatically. |
| Revive in town | Get up now, in your revive town. |
Two other ways do the same as the button: click the line about your death in the chat log, or type /respawn (or /revive). Closing everything to see the world is safe: the chat line stays there.
In a land war you get up at your side's own spot instead, and the button makes you wait. See Wars and conquest.
The death window always takes you to town. These stand you up where you fell.
Resurrection
In the gameA Taoist skill, learned from its book from level 35. Aim it at a dead player in your group or your guild, and if it works they stand up where they lie.
- Each raise uses one Talisman of Soul, worn in the amulet slot.
- It doesn't always work. When first learned, about one try in four does. Each skill level improves that, and from skill level 3 it never fails.
- They come back with part of their health and mana, and more as the skill grows.
- After a raise that works, the skill rests for 20 seconds. A failed one can be tried again as soon as the spell is ready.
- It also raises a wizard's fallen pet, if the wizard is in your group or guild.
- Empowered Resurrection, learned later, raises more fallen friends lying nearby in the same cast, each for a talisman of their own.
Pill of Reincarnation
In the gameThe one item you can use while dead. Use it from the bag and you stand up where you fell, with full health and mana. Another pill won't work for 5 minutes, however many you carry.