The small map in the top right corner of the screen, open from the start. Press V to hide it or bring it back. It shows the map you're on, drawn from the map itself, with you in the middle.
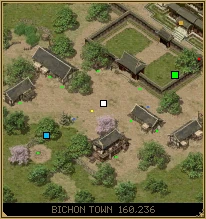
| Mark | What it is |
|---|---|
| White square, black rim | You. |
| Lime square, black rim | A member of your group, anywhere on this map. |
| Sky blue square, black rim | A member of your guild, anywhere on this map. |
| Small red dot | A monster near you. |
| Small blue dot | Another player near you. |
| Small green dot | An NPC near you. |
| Small yellow dot | Something lying on the ground near you. |
| Gold dot | A way out of the map: a door, a cave mouth, a road to the next map. |
| Orange square, black rim | One of the last few monsters on a dungeon floor. |
| Large red or cyan dot | A boss (red) or a player (cyan) found by a tracking item, however far away. |
| Dotted line and lime ring | Where you're walking to, after a right-click on the big map. |
Along the bottom are the map's name and where you're standing. Hover over a marked ally to see their name.
Moving and sizing it
- Drag it from anywhere on it to move it.
- Drag an edge or the corner to make it bigger or smaller: from 80 pixels up to a quarter of the screen each way.
- Esc doesn't close it. Only V does.
The minimap is always at the map's own scale, so it shows the streets around you in detail. For the whole map, use the big map.
Press B. The whole of the map you're on, which you can move around and zoom, with the quests you can do on it down the left.
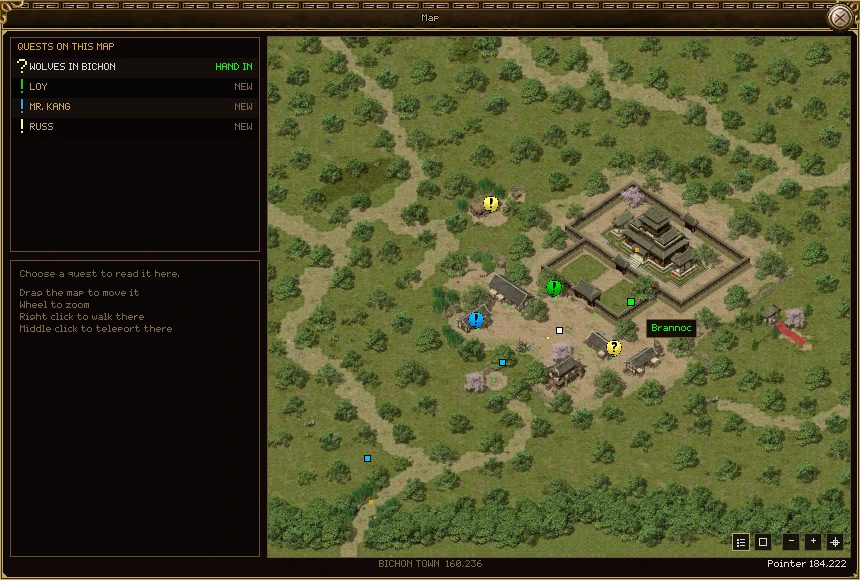
| Part | What it does |
|---|---|
| Quests on this map | The quests you can do here (see Quests on the map). Click one to read it below and ring its person on the map. |
| The panel under it | The chosen quest in full, as in your quest log. With nothing chosen, a reminder of what each mouse button does. |
| The map | Everything the minimap marks, plus every quest NPC on the map, however far away. |
| Show or hide quests (three lines) | Hides the quest column to give the map the room. The game remembers your choice. |
| Full screen (square) | Fills the screen with the map, and back. Closing the map leaves full screen. |
| - and + | Zoom out and in, about the middle. |
| Follow me (cross-hair) | Back to where you are, after you've moved the map. |
| The footer | The map's name and your position in the middle; on the right, the cell under the pointer, which is handy for telling a friend where to meet. |
The mouse
| Do this | And |
|---|---|
| Left-drag | Moves the map. |
| Left-click a quest bubble | Chooses that NPC's quest in the column. |
| Wheel | Zooms in and out about the pointer, up to four times the map's own size. The markers grow as you zoom in. |
| Right-click | Your character walks there, by the way round walls. A dotted line shows the route on both maps. If there is no way there, you're told so. |
| Middle-click | Teleports you there if you wear a Loop of Teleportation. Without one, you walk there, as with a right-click. |
| Hover over a marker | Shows the name of an ally, a quest NPC, a tracked boss or one of a dungeon's last monsters. |
The window can be dragged to any size up to nearly the whole screen. It opens on the map you're on and shows only that map: there is no view of the whole world.
Everybody in your group or your guild who is on the same map as you is marked on both maps, however far away they are.
- Group: a lime square with a black rim. Guild: a slightly smaller sky blue one. Somebody in both is marked as group.
- Hover over a marker to see who it is.
- The far-away markers move once a second; anybody close enough to see moves as they walk.
- Dead allies are still marked, so you can find them to bring them back. Hidden ones are too.
- Only people on the same copy of the map count: a guild member in a dungeon of their own, or in a war, isn't marked on the public map.
The big map marks every NPC on the map who has something for you, with the same bubble that floats over their head in the world.
| Bubble | Means |
|---|---|
| ! | A quest you can take. |
| ? in colour | A quest ready to hand in. |
| ? in grey | A quest you're still working on. |
| Yellow | An ordinary quest. |
| Blue | A daily or weekly quest. |
| Green | A story quest. |
| Purple | An account quest. |
The quest column
Down the left of the big map, in this order:
- Quests you hold that are handed in on this map, with the ones ready to hand in first, marked HAND IN.
- Quests you hold that were given on this map.
- NPCs with something new for you, marked NEW. What they offer is theirs to tell you: go and speak to them.
Click a row and the person you need is ringed on the map, and the map moves to them if they're off it. Your quest log has the rest of the detail.
Inside a dungeon, once 10 or fewer of a floor's monsters are left, every one of them is marked on both maps in orange, however far away.
Hover over one on the big map to see what it is. It saves walking every corridor looking for the last straggler. The count of what's left, and the rest of how dungeons work, are in Dungeons.
Every safe zone is ringed with glowing posts, the same beams a trap octagon throws up, standing on the first cells outside it.
- Inside the posts no other player can attack you, and you can't attack them. Step past them and you can be. Monsters that wander into a town can still fight. The rest is in Combat, PK and death.
- Two safe zones that touch are ringed as one, with no posts down the join.
- Arriving in a town, through a door, by teleport or by logging in there, binds you to it: it becomes the town a town portal scroll takes you back to.
- The posts are only a picture. If you'd rather not see them, untick Settings (O), Graphics, World, Show safe zone borders. The zone is just as safe either way.
Talk to the Hexa Holy Stone in Bichon Town, or any of the teleport stones across Shandam. A list of places opens under what it says. Pick one and press Teleport.
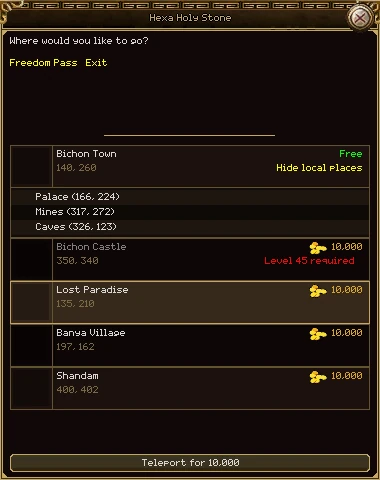
| Part | What it does |
|---|---|
| A place | Its name, the cell you land near, and the price. Click it to pick it; it is framed in gold. |
| Free | A place on the map you're standing on. Moving about your own map is always free. |
| The price | In red when you can't afford it. |
| Level n required | In red, and the place can't be picked, until you reach that level. |
| Local places (n) | Opens the spots on that place's map beneath it, one line each: Hide local places folds them away again. Only shown while you're standing on that map. |
| A name in grey with no price | A place you haven't found yet, shown only because you have found some of its local places. |
| Teleport | Sends you to the picked place and takes the price. It says Teleport for 10,000 when there is one, and stays grey until you've picked somewhere you can afford. |
Finding places
A stone only lists the places you've found. Most are found by going there: walk within 15 cells of the spot and you're told You have found place. A few are open from the start, and two of Bichon's are found the first time you go into the dungeon they stand beside.
Where you can go
Every trip to another map costs 10,000 gold. You land within a cell or two of the spot.
| Place | Local places | How it's found |
|---|---|---|
| Bichon Town | Palace; Mines (found by entering the Deserted Mine); Caves (found by entering Bichon Cave) | Open from the start |
| Bichon Castle | Visit it. Level 45 and up only. | |
| Lost Paradise | Visit it | |
| Banya Village | Visit it | |
| Sabuk Keep | Visit it | |
| Shandam | North, South, West and East Stones | Open from the start |
| Border Village | North, South and West Stones | Visit it |
| Ginko Valley | Town Stone, Mines Stone | Visit it |
| Taoist Village | Visit it | |
| Serpent Valley | West and North Stones | Visit it |
| Sabuk Province | South-west and South-east Stones | Visit it |
| Desert Fort | North and South Stones | Visit it |
| Stone Tomb Desert | Visit it | |
| Stone Jungle | Visit it |
The Shandam stones offer all of these. Bichon Town's Hexa Holy Stone offers the five Bichon places and Shandam. Sabuk Province lands at its north stone: no stone sends you inside the castle walls.
The Hexa Holy Stone in Bichon Town also takes a Freedom Pass, instead of gold, to a few places of its own. Follow the Freedom Pass link in what it says.
Three things in your bag move you without a stone. Right-click a scroll to read it; one scroll is used each time.
| Item | What it does | Where it won't work |
|---|---|---|
| Scroll Of Town Portal | Takes you to the town you're bound to: the last one you arrived in. If you've never been bound anywhere, to the map's own town. | Maps that forbid it, which is most dungeons |
| Scroll Of Random Teleport | Somewhere at random on the map you're on. Handy for getting out of a corner. | Maps that forbid teleporting |
| Loop Of Teleportation | A ring. While you wear it, middle-click anywhere on the big map and you're there, on the same map. Then it needs 5 minutes before it works again. | Maps that forbid teleporting. If the ring can't take you, you walk there instead. |
A map that won't let you go says so: You cannot be recalled to town from here or You cannot teleport from this map. Nothing is used up when it refuses, and a refusal doesn't start the ring's wait.
Most maps have a theme of their own. Walk from one map to the next and the old tune fades out as the new one fades in.
When a tune plays to its end there is a short quiet before it comes round again. All of it is in Settings (O), Audio, Music:
- Music: how loud the map themes are.
- Music fade: how many seconds a tune takes to fade in and out.
- Quiet between tracks, least and most: how long the quiet lasts. Each rest is picked between the two; both at 0 plays the tune straight round again.